 Skip to content
My first When i attempt to cool a small processor. I was only a year into my journey of tinkering with single-board computers, and I had no clue what truly separated a CPU fan from a heatsink. Today, I want to share what I’ve learned.
What Readers Will Learn
In this section, I plan to show you:
- The core functions of CPU fans and heatsinks
- Their strengths and shortcomings
- How I decide which cooling method suits my projects best
Why This Topic Is Important for Raspberry Pi and Similar Projects
I often use Raspberry Pi boards for everything from home projects to professional prototypes. Proper cooling can make or break a project’s stability. I’ve struggled with overheating in cramped spaces. To fix that, I looked deeper into the science of fans and heatsinks, and discovered how critical their differences are.

I once tried a massive cooling fan on a small Pi project, and the result was a noisy device that reminded me of a jet engine. That story leads me into the next section.
Understanding CPU Fans
A CPU fan is more than a spinning blade. Let me walk you through its definition, components, and the idea of active cooling.
Definition of a CPU Fan
A CPU fan is a small motor-driven device. It sits atop or close to the processor. Its purpose is to push air across the surface to remove heat quickly. I compare it to a mini hurricane, but less dramatic in scale.
Components and How They Function
Most CPU fans include:
- Fan blades (usually plastic)
- Motor to spin these blades
- Power connectors for electricity
- Mounting system to keep them secured
They spin to move cool air in and hot air out. I love how straightforward it is: the motor pushes air, and the airflow keeps the temperature down.
Role in Active Cooling Systems
Active cooling is all about movement and power. The fan forces air circulation, which keeps heat from building up. It relies on electricity, so there is some noise and energy use. But it also gives a strong, direct cooling effect.

Sometimes I meet folks who want silent operations but end up picking a large fan for tiny workloads. Next, let’s see how heatsinks approach the same problem from a quieter angle.
Understanding Heatsinks
Heatsinks come in many shapes and sizes. They rely on metal surfaces and air contact. I’ve tried a few designs in my own projects, and I’m still amazed by their versatility.
Definition of a Heatsink
A heatsink is a chunk of metal (like aluminum or copper) shaped in a way that spreads out heat. It uses metal fins to expose a wide area to air. This passive method doesn’t need a motor or electricity. It simply draws heat away from the processor.
Common Materials (Aluminum, Copper, etc.)
Heatsinks often use:
- Aluminum: Cheaper, lighter, and easier to shape
- Copper: More expensive but better at conducting heat
- Hybrid designs: Sometimes a copper base with aluminum fins
Each material provides a distinct advantage. When I want the best thermal conduction, I pick copper. If I’m on a budget, I choose aluminum.
Role in Passive Cooling Systems
Passive cooling means no moving parts. The heatsink simply radiates or transfers heat to the surrounding air. This approach is quieter and draws no extra power. But it also depends heavily on ambient temperature and airflow around the fins.

I once met someone who tried to run an overclocked Raspberry Pi with only a tiny heatsink. Let’s just say it got toasty. That brings us to the direct differences between fans and heatsinks.
Core Differences Between a CPU Fan and a Heatsink
Here, I examine how each method cools, how much power it takes, and the overall design. I put this in a small table for clarity.
| Factor | CPU Fan (Active Cooling) | Heatsink (Passive Cooling) |
|---|---|---|
| Cooling Mechanism | Moves air over CPU | Spreads heat through metal fins |
| Power Consumption | Requires electricity | No electrical power required |
| Noise | Can be noisy when spinning | Silent |
| Design & Weight | Often smaller but can add bulk | Usually metal fins, can be larger/heavier |
| Maintenance | Needs dust cleaning | Minimal cleaning |
Cooling Mechanism: Active vs. Passive
Active cooling pushes air. Passive cooling spreads heat without forced airflow. I view it as the difference between a fan in your face and opening a window to let a breeze in.
Power Consumption and Noise
A fan needs power and can get noisy. A heatsink is silent but depends on ambient airflow. Sometimes I get annoyed by even a mild fan hum. Other times, I need that extra forced air.
Size, Weight, and Design Variations
CPU fans can be small but add the thickness of the fan assembly. Heatsinks might be slim but can span out with tall metal fins. I’ve seen some monstrous heatsinks that tower above the board.

One time, I attached a large block of copper on a Pi board, then realized I had no space left in the enclosure. Let’s talk about pairing fans and heatsinks, because sometimes they work best together.
How CPU Fans and Heatsinks Work Together
Fans and heatsinks often join forces. I’ve used this combo for top performance. The fan blows air through the heatsink’s fins to improve heat removal.
Combined Cooling Approach
When you fix a fan on top of a heatsink, you get both worlds. You can keep the metal cool while forced airflow whisks away heat. This is my go-to setup when pushing clock speeds or dealing with heavy workloads.
Scenarios Where Both Are Necessary
- Overclocking a Raspberry Pi
- Running resource-heavy software in a tight space
- Industrial-level tasks like real-time monitoring
I find these combos especially helpful when I can’t risk overheating or when the environment is already warm.

I recall trying to push my board’s CPU to new limits. My CPU was stable, but the heat soared. Then I installed a robust heatsink-and-fan combo. The difference was night and day. Let’s list out the benefits and drawbacks of CPU fans next.
Pros and Cons of CPU Fans
Nothing is perfect. Fans have pluses, but they also carry certain drawbacks I’ve observed in daily use.
Advantages (Cooling Efficiency, Quick Heat Dissipation, etc.)
- Fast heat removal
- Good for small enclosures if placed well
- Keeps CPU temps stable under heavy load
Disadvantages (Noise, Power Consumption, Maintenance)
- Can be loud if the fan is large or runs at high speed
- Consumes extra power
- Requires cleaning to remove dust and maintain performance

When I shared these thoughts with a friend, they worried about dust clogging the fan. It’s a valid concern. And that transitions us perfectly to the pros and cons of heatsinks.
Pros and Cons of Heatsinks
Heatsinks might look simple. Yet they hold a range of advantages. They also come with some limitations if the environment lacks airflow.
Advantages (No Moving Parts, Minimal Noise, etc.)
- Zero noise
- Consumes no electrical power
- Typically cheaper in the long run
- Highly reliable with fewer points of failure
Disadvantages (Limited Cooling Potential Without Airflow)
- Needs surrounding airflow or open space
- Might not cool well under extreme loads
- Can get bulky if you need more fins or special shapes

I’ve seen multiple projects fail because people relied on a small heatsink in a stuffy, enclosed case. It just didn’t cut it. Next, let me help you figure out how I choose a method for each scenario.
Selecting the Right Cooling Method for Your Project
I weigh many factors when deciding. Do I need near-silence or strong airflow? Is the hardware pushing its limits?
Considering Performance Requirements
High-performance tasks call for either a large heatsink or an active cooling fan. Basic tasks may be fine with a small heatsink. I always evaluate how much strain my applications put on the CPU.
Balancing Cost, Noise, and Efficiency
- Cost: Heatsinks are often cheaper, but bigger or specialized ones may cost more.
- Noise: Fans make noise, but not all fans are loud.
- Efficiency: Active cooling is usually better at keeping temperatures low.
Assessing Space Constraints
If my enclosure is cramped, a low-profile heatsink could be best. But if I have room, a fan plus heatsink might keep everything extra cool.
Factoring in Custom Branding or Design
Sometimes, my partners need a custom enclosure with a brand logo. In these cases, I consider how to hide or integrate the cooling solution. At custom raspberry pi cases times, a well-designed fan grill or a branded heatsink can be part of the final look.
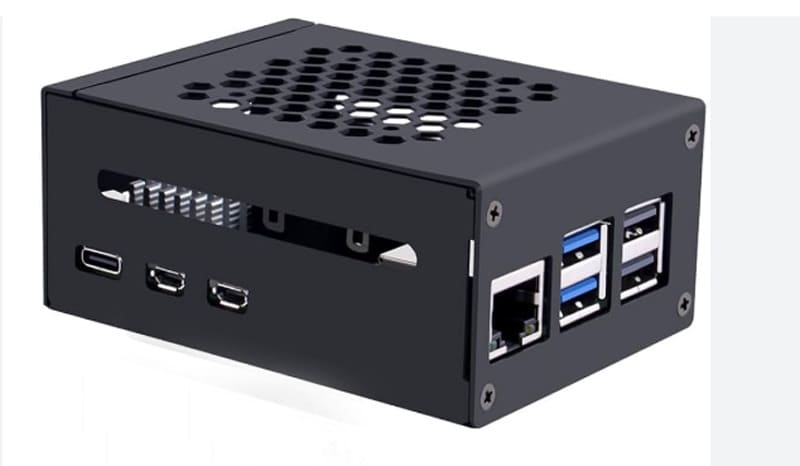
My friend Davide once insisted on a stylish enclosure design. That gave me a new puzzle: fitting a large fan while preserving a sleek exterior. Now, let’s see where fans and heatsinks shine in real-world setups.
Common Use Cases in Raspberry Pi and Other Single-Board Computers
I’ve helped many clients choose a cooling method for different projects. Here are some typical scenarios I run into.
Lightweight Applications (Home Entertainment, Basic Projects)
For simple tasks like playing media or browsing, a small heatsink might do the trick. You get silence and simplicity.
High-Performance Applications (Overclocking, Industrial Use)
Overclockers and industrial users need more robust cooling. They aim to run tasks at full throttle with no thermal throttling. A good fan or fan-heatsink combo helps here.
Custom-Designed Enclosures and Re-Branding Options
If you’re building a custom enclosure, you can design for a fan, a heatsink, or both. This is especially useful for businesses that re-brand Raspberry Pi accessories. At times, I help my B2B clients, like local distributors, to pick the best solution.

Many people I talk to feel uncertain. They wonder if they should invest in a fan or just stick to a heatsink. Let me wrap this up with a conclusion that highlights the key differences.
Conclusion
I’ve spent hours testing different methods. Each project might demand a unique approach. In my experience, success comes from knowing the trade-offs.
Recap of Key Differences
- Fans use forced air, need power, and can be noisy.
- Heatsinks passively radiate heat, require no power, and are silent.
Final Recommendations for Project Success
Pick a cooling method that matches your workload, budget, and design goals. I prefer fans for heavy tasks and heatsinks for light ones. If I’m pushing performance to the limit, I combine both. I hope this helps you tackle your next build with confidence.




